Amapola, my pretty little poppy
You're like that lovely flower so sweet and heavenly,
Since I found you, my heart is wrapped around you
And loving you, it seems to beat a rhapsody.
--English language lyrics by Albert Gamse
To hear Andrea Bocelli sing Amapola in Spanish, click here.
Why do I bother I don't know
I'll turn off my radio
Day after day
The airways are awash
With songs of ones in love
And those who are out of
There's just not enough songs about squash
I'll turn off my radio
Day after day
The airways are awash
With songs of ones in love
And those who are out of
There's just not enough songs about squash
To hear Darren Hanlon sing this, click here.
But at night i'd had these wonderful dreams
Some kind of sensuous treat
Not zucchini, fettuccine or Bulgar wheat
But a big warm bun and a huge hunk of meat
Some kind of sensuous treat
Not zucchini, fettuccine or Bulgar wheat
But a big warm bun and a huge hunk of meat
To hear Jimmy Buffett sing Cheeseburger in Paradise, click here.
Okay, okay, enough with the songs already. Geez, we normally only get one song and here there are three. Well, yeah. But there are also five pictures that are almost identical unless you look really closely. What's going on here?
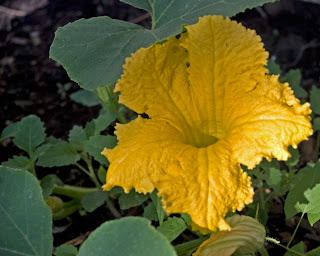
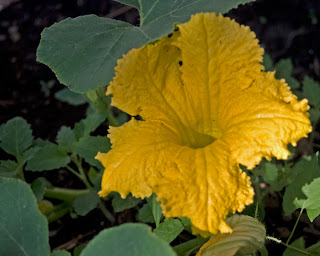
Well first off, let's talk about the songs. When I began thinking about this post, I had a set of shots of a yellow squash blossom...12 shots, to be exact. The first song that came to my mind was Amapola, which I remember hearing as "Amapola, pretty little flower...." And certainly, this squash blossom is a pretty little flower, or a pretty not-so-little flower. But when I went to look up the lyrics for Amapola, I learned that 1) Amapola refers to a poppy, not just any old yellow flower, and 2) the lyrics as written on the web actually say "poppy," not "flower." Hmm.
OK, so let's do a search for "songs about squash." That brought up the Darren Hanlon song, "There's not enough songs about squash." Well, I could certainly agree with that statement, and the song is fun, even if the squash it's talking about is the racket-ball game, not the vegetable.
Finally, what pops into my mind but Cheeseburger in Paradise. The only problem here is that the squash in question (or in the pictures) is not a zucchini, but rather a hard winter squash. So, you get three songs, none of which actually fit the bill. But they're fun songs so enjoy anyway.
That brings us to the pictures themselves. This started out to be an exercise in HDR processing. The sun was shining brightly, a bit too brightly perhaps, on one particular squash blossom, so I got my camera, fitted it with the Sigma 50 mm macro lens, put the whole thing on my tripod and knelt down to snap away setting the bracketing to 2 stops plus and minus. If you remember my previous post about HDR, the process involves taking three (or more) shots at different exposures and then letting Photoshop merge the shots together to form one. For this to work, it is crucial that there be no camera movement between the various exposures. Unfortunately, my tripod, even with the legs splayed as far apart as possible, kept my camera at too great a distance to take a macro shot at 50 mm. I'm back to holding the camera by hand and hoping for the best. My best wasn't good enough. Even with a camera capable of taking 3 shots per second, my ability to shake the camera during that second was even greater. So much for HDR with this image.
These days I shoot entirely in "raw" format. If you don't understand what that means, you can think of "raw" as being the rough equivalent of a film negative. An image shot in "raw" cannot be used directly, but has to be processed and changed into a different format, usually TIFF or JPEG. I'm not going to go into those formats here. Suffice it to say that the purpose of a "raw" image is, and here I quote Wikipedia, "to faithfully record both 100% of exactly what the sensor "saw" or "sensed" (the data), and the conditions surrounding the recording of the image (the metadata).
 ISO 125 50mm f/8 1/25o second
Once you have downloaded your shots from camera to computer, you can load them into Photoshop's Camera Raw processing dialog. In my attempt to play with HDR, I chose to shoot each set of photos using a different and shutter speed. Usually for daytime shots, I shoot in priority mode, which means that I set the and let the camera choose the shutter speed automatically. Under similar lighting conditions, every time you change the , the shutter speed will adjust accordingly. The smaller the , the more time will be required to let in the appropriate amount of light. If you look at these pictures, you'll see that as I opened the step by step, the shutter speed increased. The top photo here was taken with the set at f /13, which required 1/90th of a second to get what the camera considered the "proper" exposure. The second set of shots was taken at f /11 which required a shutter speed of 1/125 of a second. For the third, I opened the even further to f /8 and finally to f /5.6, which caused the camera to use shutter speeds of 1/250th and 1/500th of a second respectively. The idea here was to find what difference there would be in the amount of detail obtained. As a rule of thumb, the larger the , the shallower the depth of field. Since I was working with a macro lens, trying to get as close as possible to my subject, there isn't a great difference in the depth of field required.
 ISO 125 50 mm f /5.6 1/500 second
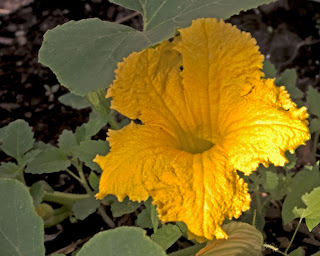
In the end, I used HDR processing for one group of images, the second group. I then went back and took the "standard" exposure from each group, and brought them one at a time into the Camera Raw dialogue. In an effort to reduce variability, I used exactly the same settings for each image. In Photoshop CS4, Camera Raw allows you a great deal of latitude and many ways of processing your images. As I'm just learning, I stuck with the "Basic" tab which gives options for adjusting the "white balance," the "temperature," the "tint," the "exposure," "recovery," "fill light," "blacks," "brightness," "contrast," "clarity," "vibrance," and "saturation." You also have the choice of clicking on "Auto" to let Photoshop set these ranges, or "Default" which will take you back to the way your camera set the image in the first place. At some point in the future, I'll go into greater depth on each of these various adjustments. For now, I'll leave you with the task of trying to determine if there is, indeed, any visible difference in the five images. I look forward to your feedback.
 Photo #2 above processed as an HDR image


1 comment:
Interesting exercise! On my uncalibrated monitor the first shot looks a tad bit warmer than the others. That could be due to the lighting conditions at the moment that shot was taken though. Have you ever read Understanding Exposure by Bryan Peterson? It was the reading material for a photo book group I was in. Very useful stuff!
Post a Comment