Showing posts with label High Dynamic Range. Show all posts

Tuesday, February 3, 2015

More Adventures in HDR and other Photographic Games

The view out our living room window
February 2nd, 2015

I've gotten back to playing with my camera.  Several years ago, I was introduced to HDR  (High Dynamic Range) photography, and I tried it with mixed success.  I even wrote a blog post about it back in 2009 which you can read here, if you wish.  But eventually, I tired of the procedures involved and put them aside.  This past week, the sun was shining brightly here at home, and it was the last day of January, so I decided I should get out of the house and get some good landscapes--oh and while I was at it, find a few more geocaches.  Loading up my Garmin Montana 650t with caches from west of Thompson Falls to Clark Fork, Idaho, on both sides of the river, I jumped in the car with GPS, camera, a change of lenses, and tripod, and took off down the road.  I had gone just over a mile when I met Kevin coming home.  When he asked what I was up to, and I told him, he asked if I would like him to come along.  Well, duh.  Yes, I always enjoy his company on the road.

On the way to Thompson Falls, I asked Kevin to pull over, and I took a few pictures of Badrock Canyon.  This is the narrowest part of the Clark Fork Canyon between here and Idaho, and if you know where to look, you can see the marks left by the rush of Glacial Lake Missoula, as it poured down this canyon and across Idaho to scrub the landscape of eastern Washington.  The amount of water, and the speed with which it flowed left marks on the rock sides of the canyon that enable scientists to estimate just how much water went through here.  They say that the water came through the canyon at 9.46 cubic miles per hour, or 60 times the flow of today's largest river, the Amazon.  

Badrock Panorama
January 31st, 2015

While taking a few pictures, I noted an electric pole right in the middle of my shot.  I adjusted my stance, and took two pictures, one with the pole on the right, and one with it on the left.  I knew it was possible to "stitch" photos together to make a panoramic image, but I'd never done it with my DSLR. Back in the truck, I noted that our blue sky was disappearing as we headed west.  It was also quite cold and windy.  Not a good prognosis for more picture taking.

Long story short, we continued on west, eventually stopping just a few miles east of Trout Creek.  I grabbed ten new geocaches along the way, but the weather really wasn't cooperating, and I had hit some button on my GPS that stopped it from giving me the information I wanted.  In frustration, I suggested that we return home, and that's what we did, stopping at Simple Simon's in Thompson Falls for a pizza dinner.

Back at my desk, I transferred the images from my camera's memory card to my hard drive, and opened up Photoshop.  It turns out that in CS5, it's very easy to make a "stitched" panorama.  I was amazed.  I had expected to have a great deal of trouble making such an image, but the computer did almost all the work and I ended up with the Badrock Panorama posted above.  If printed at its normal resolution, that image would measure 1 foot tall by 40 inches wide.  I've found a new way to play!  By the way, the image at the top of the page, if printed at full resolution, would measure 1 foot tall by five feet wide!  And I created another image that would actually print out nine feet wide, if I really wanted to do such a thing.

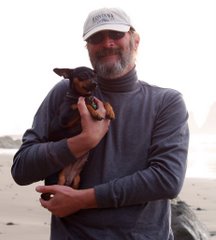
Self Portrait in HDR
February 1st, 2015

The simplicity that CS5 made of "stitching" together panoramic shots, made me take another look at HDR images.  Accordingly, I set up the tripod in the living room and took three bracketed self-portraits, which I combined to create an HDR photo of my face--with every possible line and wrinkle in plain view.  I posted this image on Facebook, and one of my artist friends commented that she'd really like to take that portrait and copy it in oil.  I've never had someone want to paint my portrait before.  I'm tempted to let her.

The next day, I tried the self portrait again.  This time, I did not sit in my recliner, which left me back-lit by the picture window, but rather moved to the couch which faces the window.  Unfortunately, I did not move the chair from the background, so I ended up with Mickey Mouse ears, but I like the portrait so much that I made it my new Facebook profile pic.  Another FB friend suggested that the picture looked like someone had taken a black and white and hand colored it.  I'll let you decide.  Just for comparison, I'm including the same photograph processed as a single image so you can see the difference between a "normal" photo and a three-layered HDR shot.

Second Self Portrait in HDR
February 2nd, 2015

I've also tried some HDR shots through the window, looking at the trees and the deer in the fog.  They have an interesting look, but when I take the image and process it as I normally would, I think I prefer the non HDR version.  In any event, I've certainly found a new way to occupy my behind the camera time, and I look forward to more sunny days along the river and lake.

Self Portrait as a "Normal" Photograph
Don't you like the HDR version better?
February 2nd, 2015


Monday, June 22, 2009

HDR -- What the *** is HDR?

Study in Orange
(A poppy growing in my next door neighbor's front yard)
One of my first efforts at HDR Imaging
Taken 6/20/09 in Missoula, Montana

NOTE: Clicking on any picture, or on any link, will open a new window without closing the current window, and show the pictures full screen or larger (depending on your screen). I really recommend viewing the photos full screen so you can get a better idea of just what HDR imaging can do.

WARNING: The text here is probably of interest only to those people who are having fun playing with digital photography. Feel free to view the pictures and skip the text. Or skip it all, how will I know?

Kodachrome
They give us those nice bright colors
They give us the greens of summers
Makes you think all the world's a sunny day, Oh yeah
I got a Nikon camera
I love to take a photograph
So mama don't take my Kodachrome away

--Paul Simon

To hear Paul Simon sing Kodachrome on YouTube, click here!

Forget Mama, Kodak is taking Kodachrome away. Apparently there is only one place left in the country that actually processes Kodachrome. But that is beside the point. Can't remember the last time I actually bought Kodachrome, or Ektachrome for that matter. For a brief while after I bought the Nikon Coolpix for my birthday in October 2006, I continued to use my Pentax 35mm SLR, but once I got the D80, I went completely digital and haven't looked back. Apparently I'm not alone in that. Even for Kodak, 70% of their current business is digital.

And digital photography is amazing. The things you can do with those bits and pieces known as pixels once they're cavorting in your computer. With Kevin on the road, and my evenings now free for me to do whatever I choose, I chose to start improving my digital photography skills. First off, I started looking back through the past three years of pictures I've taken with my great Nikon D80, and it was sobering to find that the pictures I took three years ago look much better than the ones I'm taking now. Have I gotten lazy? complacent? Whatever, it's not a good thing to regress in one's skill set. SO....

I now have available to me Adobe's Creative Suite 4 with a whole range of great programs, including Photoshop CS4. Up until now, I've used Photoshop Elements for all my editing work, and it has served me well. I'm told that anything you can do in Photoshop, you can do in Elements, but you'll have to work twice as hard. Then again, learning how to use Photoshop involves a lot of time and effort, but I think it will be worth it.

Recently I followed the lead of a couple of on-line photographer friends and joined Red Bubble as a way to offer my photography for sale on-line. As with many other on-line social networks, Red Bubble has a variety of groups you can join. One I joined is for those who photograph wildflowers. Among the stated criteria for this group, I found the following: No photoshopping or HDR work will be accepted. OK, I can agree to this--except I have no idea what HDR means.

Good Morning, Glory
Weeds growing by my mailbox
Another early HDR effort
Taken 6/20/09 in Missoula, Montana

As it turns out, HDR is the abbreviation for High Dynamic Range. (The link will take you to the Wikipedia article on HDR Imaging.) I can't speak for you, but I'm of the generation that never accepted being told what we could not do. I had to find out just what HDR is and how I could play with it. Scott Kelby, the author of one of my Photoshop CS4 manuals, was just the man to tell me what and how. In fact, he has a whole chapter devoted to HDR in his Adobe Photoshop CS4 Book for Digital Photographers (Voices That Matter). Yes, that's the whole title of the book.

I followed his instructions scrupulously to produce four of the five images shared in this post, but first I had to go to my Nikon D80 manual and learn one more thing to do with my camera. Bracketing. Now I have always known what bracketing is. My dad used to bracket his pictures on a regular basis. What I didn't know was how to do it automatically with my Nikon. Now I know. (If you don't understand bracketing, it means that you take the same picture using different exposures, usually one you would consider standard, then one that is over exposed and one that is under exposed.)

So, once you have three to five bracketed shots, Photoshop allows you to merge all the images into one, in essence bringing out the details that would normally be washed out or hidden in the shadows. For the first time since I bought it, I found a reason to have a professional level Nikon instead of my one-step away from professional D80. The professional level cameras allow for 5 shots when automatically bracketing. My D80 only allows for 3. Still, given the length of time it takes Photoshop to merge three shots, I hate to think what it would take to do 5. I won't go into the numbers involved, but suffice it to say that even using 3 shots, the resultant image has more detail than standard computer monitors (or even paper should you print the image out) can handle. An HDR image starts as 32-bit or even 48-bit (whatever that means), as compared to a J-PEG image which is 8-bit. Whatever it means, it's a lot of information for your computer to handle. Once Photoshop has merged the various images into one, you can then edit that one in either Camera Raw or through the regular editing processes.

Statue of Christ in St Mary's Cemetery Annex
(I'm not happy with this image, but share it as an example of how 3-dimensional the statue becomes in HDR)
Taken 6/21/08 in Missoula Montana

After taking several macro shots of flowers and merging them into HDR images, I decided to see what would happen with larger scenes. Driving out behind our home to climb the hill and get a view of the valley, I passed the St Mary's Cemetery Annex. The sun was positioned exactly right to really light up the statue of Christ. What a subject, I said to myself, and got out of the car. By the time I got the camera on the tripod, and the tripod set in position--and most importantly by the time I realized that the camera was no longer set to automatically bracket shots, the sun had moved off the Son. So as I noted above, I'm not very happy with the final result, but it does provide an example of how isolated features, such as the statue, become almost 3-dimensional in HDR images.

Now all this supposes that you are getting exactly the same scene in each of your bracketed shots. My D80 can shoot 3 frames per second, but it's amazing what can happen in that short amount of time. I know from experience now that if you're shooting a flower that is blowing in the wind, you'll end up with a very strange, almost abstract design. Nor am I completely convinced that HDR is the way to go--at least not yet. The image that Kelby uses in his instructions is an urban landscape. With that in mind, I drove up WaterWorks Hill north of town to shoot some scenes looking over the Missoula Valley. I was careful to use the tripod and make sure the camera did not move while shooting the three bracketed images. I then processed the three as an HDR image and also processed just the standard exposure as a regular J-PEG image. I am posting both here so you can make up your mind. The flowers, I thought, were superb. The landscape, well, I'm not sure it's worth the effort. The main difference that I can see is that the clear sky is washed out in the J-PEG, but still shows blue in the HDR thanks to using the extra exposures. The overall coloring is lighter in the HDR, again because of the extra exposures, but which final product is better--well that's a judgement call. I will keep trying, experimenting, honing my skills. After all, with Kevin on the road, I do have all this time on my hands.

The Missoula Valley at 7 p.m.
This is the j-peg processed from just the standard exposure.
Taken 6/21/09 in Missoula, Montana

The HDR version of the same image
(This uses three bracketed shots merged into one image)
Taken 6/21/09 in Missoula Montana